ようやくWordpressをインストールします。
以下はすべて「sudo -s」コマンドにてroot権限での作業です。
WordPressの動作条件の確認
公式サイトの情報によると、
- PHP バージョン 7 以上
- MySQL バージョン 5.6 以上 または MariaDB バージョン 10.0 以上
となっていますので、その条件を満たすべくインストールします。
MariaDBをインストール
DBは通常はMySQLなんですが、世の中の流れを見るとMariaDBの方がよさそう…
というわけで、MariaDBをインストールします。
MariaDBの配布サイトを見ると、たくさんのバージョンが並んでいます。
この時点での最新バージョンは、10.3.2のようですので、10.3.2を使用する事にします。
- OSのVersionを確認
cat /etc/redhat-release
⇒
CentOS Linux release 7.4.1708 (Core)
OSのバージョンに従ったファイルを使用するのですが、この時点でcentos7.4用のリポジトリは存在しないようですので、7.3用の「centos73-amd64」を使用します。
- MariaDBのPGP keyをインストール
rpm --import https://yum.mariadb.org/RPM-GPG-KEY-MariaDB
- リポジトリの編集
vim /etc/yum.repos.d/mariadb.repo
[mariadb]
name = MariaDB
[mariadb]
name = MariaDB
baseurl = http://yum.mariadb.org/10.3.2/centos73-amd64
gpgkey=https://yum.mariadb.org/RPM-GPG-KEY-MariaDB
gpgcheck=1
enabled=1
- mariaDBのインストール
yum -y install mariadb mariadb-devel mariadb-server
- 日本語の設定
vim /etc/my.cnf.d/server.cnf
[client]
default-character-set = utf8
[mysqld]
character-set-server = utf8
- 起動と自動起動の設定
systemctl start mariadb.service
systemctl enable mariadb.service
- 初期設定
/usr/bin/mysql_secure_installation

NOTE: RUNNING ALL PARTS OF THIS SCRIPT IS RECOMMENDED FOR ALL MariaDB
SERVERS IN PRODUCTION USE! PLEASE READ EACH STEP CAREFULLY!

In order to log into MariaDB to secure it, we'll need the current
password for the root user. If you've just installed MariaDB, and
you haven't set the root password yet, the password will be blank,
so you should just press enter here.

Enter current password for root (enter for none):
OK, successfully used password, moving on...

Setting the root password ensures that nobody can log into the MariaDB
root user without the proper authorisation.

Set root password? [Y/n] Y
New password:               ⇒ パスワードの設定
Re-enter new password:
Password updated successfully!
Reloading privilege tables..
... Success!

By default, a MariaDB installation has an anonymous user, allowing anyone
to log into MariaDB without having to have a user account created for
them. This is intended only for testing, and to make the installation
go a bit smoother. You should remove them before moving into a
production environment.

Remove anonymous users? [Y/n] Y
... Success!

Normally, root should only be allowed to connect from 'localhost'. This
ensures that someone cannot guess at the root password from the network.

Disallow root login remotely? [Y/n] Y
... Success!

By default, MariaDB comes with a database named 'test' that anyone can
access. This is also intended only for testing, and should be removed
before moving into a production environment.

Remove test database and access to it? [Y/n] Y
- Dropping test database...
... Success!
- Removing privileges on test database...
... Success!

Reloading the privilege tables will ensure that all changes made so far
will take effect immediately.

Reload privilege tables now? [Y/n] Y
... Success!

Cleaning up...

All done! If you've completed all of the above steps, your MariaDB
installation should now be secure.

Thanks for using MariaDB!
PHPのインストール
リポジトリの確認
yumでインストールできるかなぁ~と、yumでインストールする場合のバージョンを確認します。
yum list | grep php
ごっそりと表示されましたが、
「php.x86_64 5.4.16-42.el7 base」
というのがありました。
Ver 5.4.16ですので、古そうです…(^^ゞ
最新バージョンは、7.1.11のようですので、そいつをインストールします。
- EPELリポジトリを追加
[CentOS7系]
yum install epel-release
- Remiリポジトリを追加
rpm -Uvh http://rpms.famillecollet.com/enterprise/remi-release-7.rpm
phpのインストール
- インストール
yum install -y --enablerepo=remi,remi-php71 php php-devel php-mbstring php-pdo php-gd php-xml php-mcrypt php-fpm php-mysql php-pear
- バージョンの確認
php --version
PHP 7.1.11 (cli) (built: Oct 25 2017 10:24:28) ( NTS )
Copyright (c) 1997-2017 The PHP Group
Zend Engine v3.1.0, Copyright (c) 1998-2017 Zend Technologies
大丈夫そうですね。
- PHP設定の変更
- 設定ファイルを開く
vim /etc/php.ini
- 下記の行をコメントアウトする、存在しない場合は追記
extension=msql.so
- 設定ファイルを開く
- 保存して終了(:wq)
php-fpmの設定を変更
vim /etc/php-fpm.d/www.conf
user = nginx
group = nginx

listen = /var/run/php-fpm/php-fpm.sock

listen.owner = nginx
listen.group = nginx
vim /usr/local/nginx/conf/nginx.conf
- ルートフォルダの変更
http.server.locationフォルダの設定変更location / { root /var/www; } - phpとの通信仕様を変更
http.serverセクションにて、コメントアウトされていた設定を復元すると共に内容変更location ~ \.php$ { root /var/www; fastcgi_pass unix:/var/run/php-fpm/php-fpm.sock; fastcgi_index index.php; fastcgi_param SCRIPT_FILENAME $document_root$fastcgi_script_name; include fastcgi_params; } - faviconが存在しない旨のログを出力しない設定
http.serverセクションに下記を追加# faviconが存在しない旨のログを出力しない location /favicon { empty_gif; access_log off; log_not_found off; }
systemctl start php-fpm
systemctl enable php-fpm
動作確認
- nginxの再起動
default.confを変更したので再起動。
systemctl restart nginx
- PHP動作確認
- phpスクリプトを作成する
vim /var/www/test.php
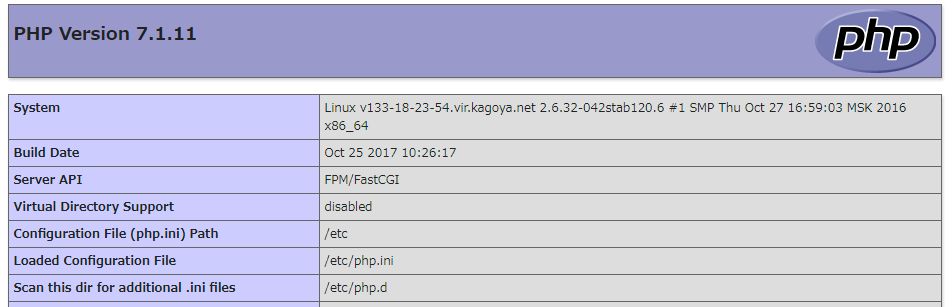
- ブラウザでインスタンスのip/test.phpを表示
以下のようなphpのバージョン情報が表示されればOK
- phpスクリプトを作成する
WordPressのインストール
WordPressファイルのインストール
公式サイトからダウンロードし展開するだけです。
展開先はnginxのキュメントのルート(/var/www)です。
- 公式サイトからダウンロード
cd /var/www
wget https://ja.wordpress.org/latest-ja.tar.gz
- 展開する
tar xzf latest-ja.tar.gz
- 不要になったダウンロードファイルを削除
rm -f latest-ja.tar.gz
- 不要になったダウンロードファイルを削除
rm -f latest-ja.tar.gz
データベースの設定
- データベースに接続
mysql -u root -p
Enter password: ⇒ パスワードを入力
MariaDB [(none)]> ⇒ プロンプトが表示されればOK
- WordPress用のDBを作成
create database wp;
grant all privileges on wp.* to dbuser@localhost identified by 'password';
wp はデータベースの名前ですので、任意のものにします。
dbuser はデータベースユーザーの名前ですので、任意のものにします。
password はデータベースユーザーのパスワードですので、任意のものにします。 - データベース操作の終了
exit
作成したデータベースをWordpressに設定
作成したデータベースをWordpressで使用できるようにします。
- 設定ファイルのコピー
cp /var/www/wordpress/wp-config-sample.php /var/www/wordpress/wp-config.php
- 設定ファイルの編集開始
vim /var/www/wordpress/wp-config.php
- データベースの登録情報を編集
/** WordPress のためのデータベース名 */
define('DB_NAME', 'wp');

/** MySQL データベースのユーザー名 */
define('DB_USER', 'dbuser');

/** MySQL データベースのパスワード */
define('DB_PASSWORD', 'password');
wp,dbuser,passwordは、先ほどデータベースの作成時に設定したものを設定します。
- 認証用ユニークキーの設定
下記の行を、WordPress.org の秘密鍵サービスで作成したものに置き換えます。define('AUTH_KEY', 'put your unique phrase here'); define('SECURE_AUTH_KEY', 'put your unique phrase here'); define('LOGGED_IN_KEY', 'put your unique phrase here'); define('NONCE_KEY', 'put your unique phrase here'); define('AUTH_SALT', 'put your unique phrase here'); define('SECURE_AUTH_SALT', 'put your unique phrase here'); define('LOGGED_IN_SALT', 'put your unique phrase here'); define('NONCE_SALT', 'put your unique phrase here');変更後、保存(:wq)します。
WordPressの設定
以降は、Wordpressの管理画面から設定を続けます。
- ブラウザでインスタンスのip/wordpress/wp-config.phpを表示し、下記のような画面が表示されれば、第一段階OK
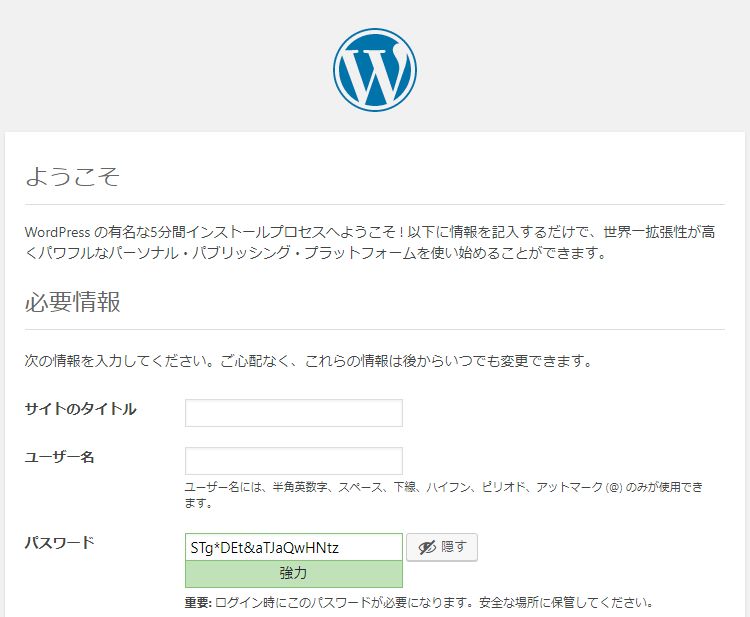
今回はここまで…
次回は、メディア関連のインストールです。

コメント